SpinAttack Manual - English
SPINATTACK MANUAL
CLIENT AREA MANUAL
YOUTUBE
SPINATTACK MANUAL
How to download the program.
-
In order to download the SpinAttack program, you must first be registered. To register, enter our site and on the Top Menu of this page and click on the option: CLIENTS > Sign Up.
Then fill out the form and at the bottom of the page click in: SEND.
Ready, you will receive an email confirming your registration. -
Once registered, go back to the site's Top Menu and click on the option: CLIENTS > Login.
Then provide your access data, ( Username and Password ) and click the button: LOGIN, be aware that these fields are case sensitive. -
Once you are in the Client Area, on the Left Menu click on the option: DOWNLOADS, hen choose the option: Version 20 demo/full. A new screen will appear.
It is very important that you read the Terms and Conditions and especially the Pre-Requirements to install SpinAttack.
Pay attention to your operational system. SpinAttack may not work with computers running Windows 7 or below. We recommend that you have Windows 10 or higher.
At the end of this new screen, click on the button: DOWNLOAD. - The download will start automatically and the file: Spinataque-Plus-Install.rar, will be saved in the default downloads folder that is configured on your machine.
- Watch the video on how to download the program.
How to install the program.
- Once the download is complete you will need to unzip installation files. You will need to have installed on your computer a program that compresses and decompresses files, such as WIN-RAR. If you don't have it, you can download Win-rar for free from the company's official site. Link - https://www.win-rar.com/start.html
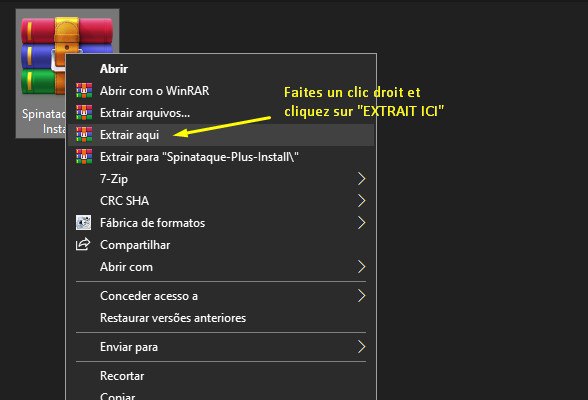
- To unzip the installation file, go to the folder where you saved it and locate the file: Spinataque-Plus-Install.rar, and double click on it. The unzipping program will open.
- In the unzip program, choose the folder where you want the installation files to be saved and click: Unzip or Extract to.
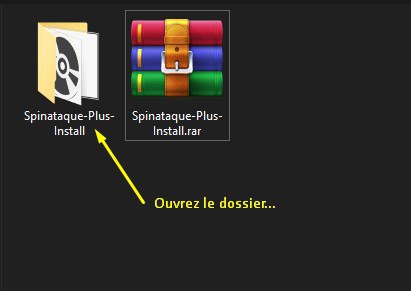
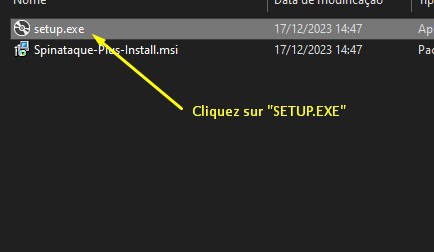
- Go to the folder where the installation files were unzipped and browse for the file: setup or setup.exe and double click on it, the installation will start just follow the steps described in the installation program.
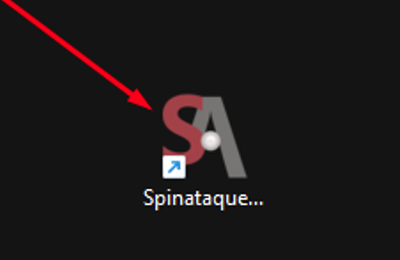
- After completing the installation, the shortcuts to access SpinAttack will be created on your Desktop and in the Windows Start Menu.
- Watch a video on how to install the program.
STEP 1 - Unzip files.
STEP 2 - Access the folder.
STEP 3 - Install the system.
STEP 4 - Copyright notice.
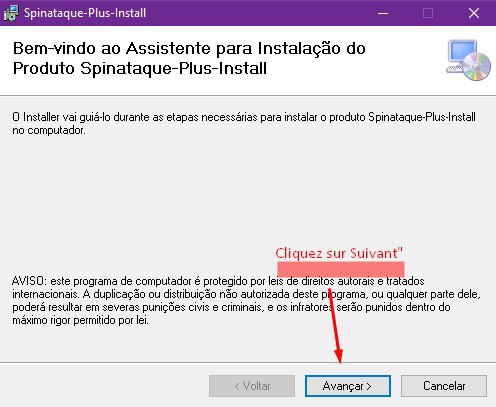
STEP 5 - User type.
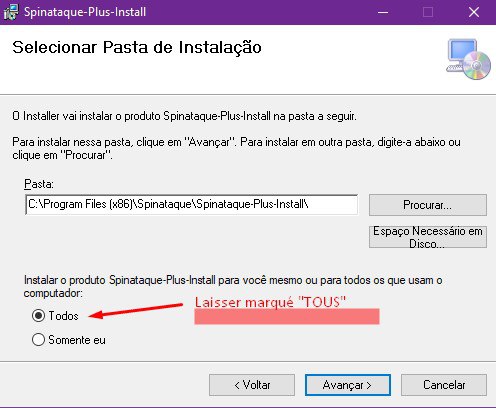
STEP 6 - Installation location.
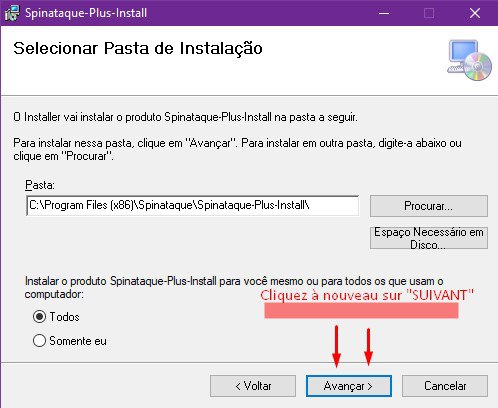
STEP 7 - Confirm installation.
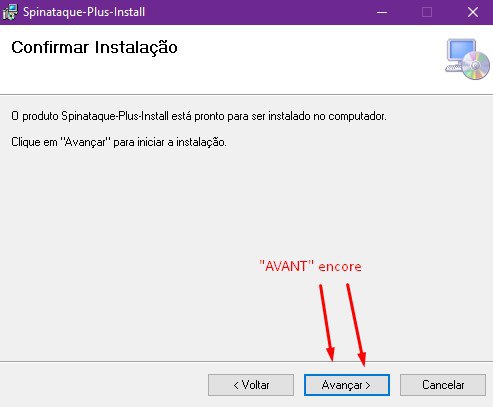
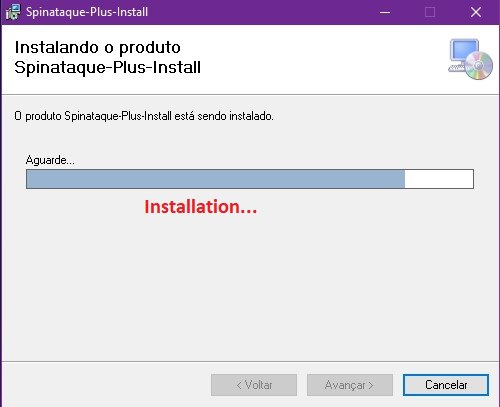
STEP 8 - Wait for installation.
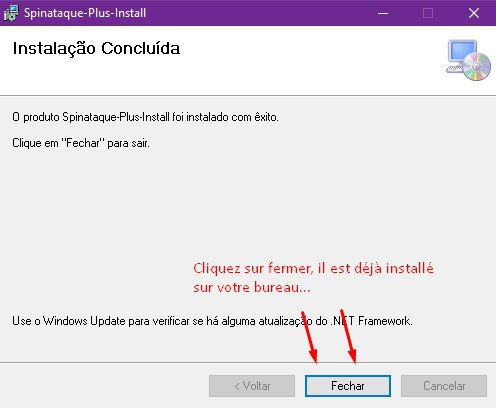
STEP 9 - Finish.
STEP 10 - Desktop icon.
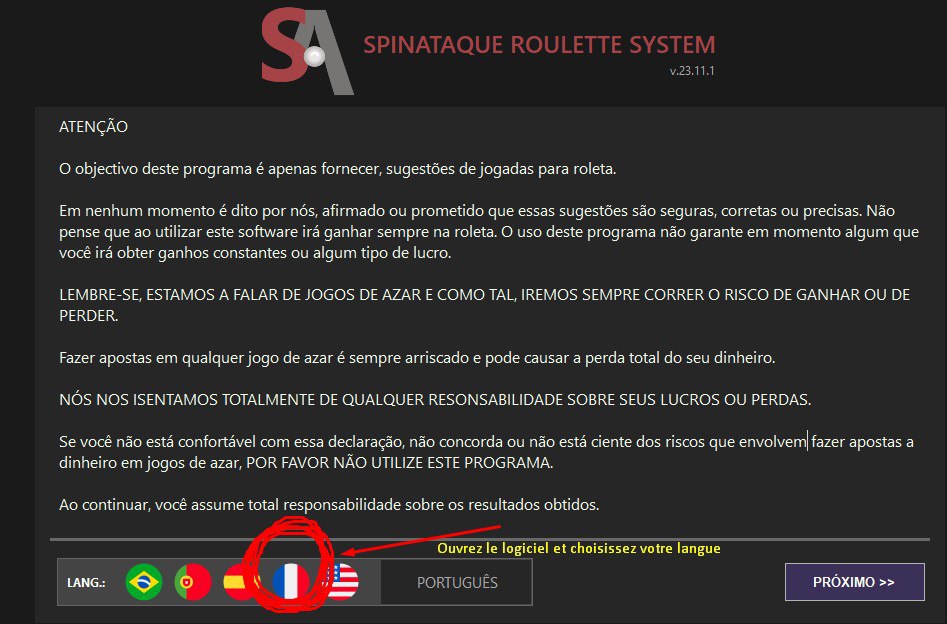
STEP 11 - Choose your language.
STEP 12 - Enter your details and connect.
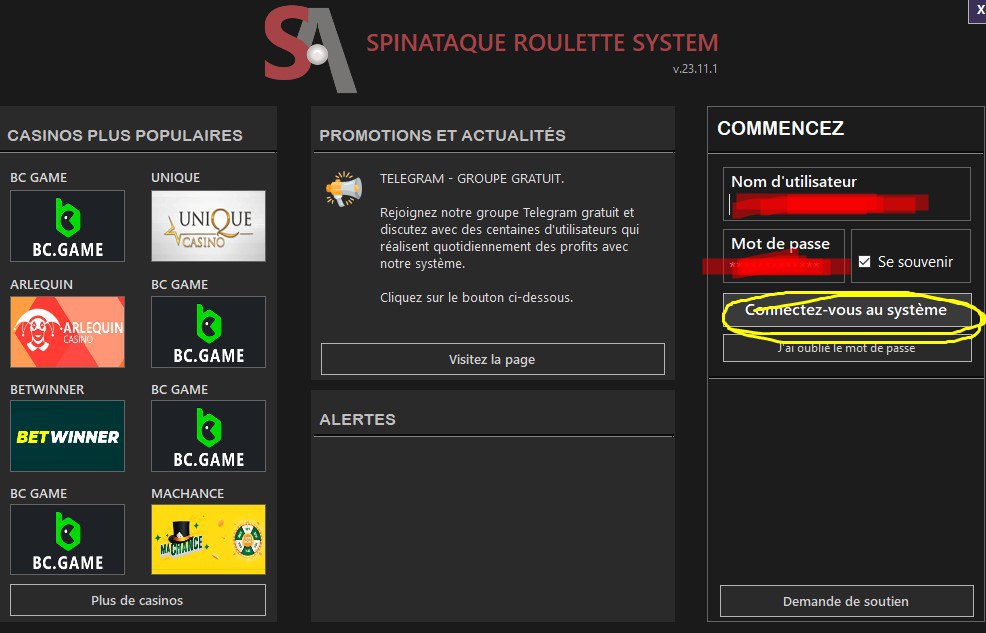
Initial screen.
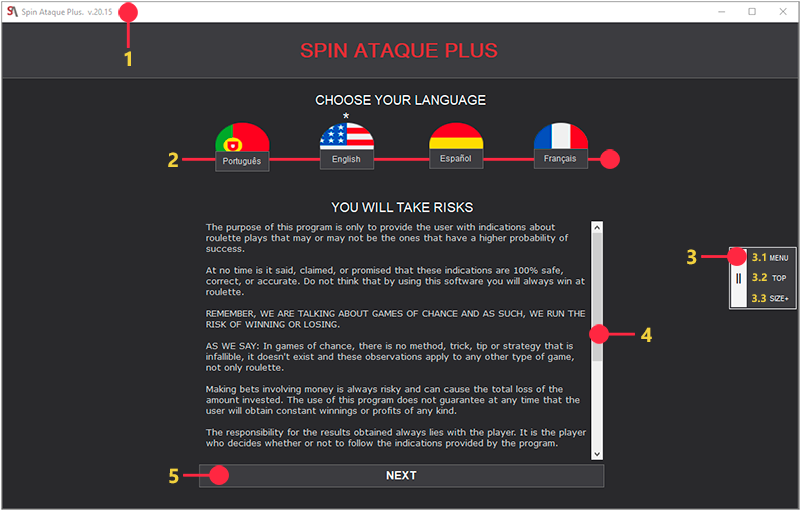
LEGEND:
- Bar that indicates your version of the program.
- Buttons to choose the language.
- Screen options:
- 3.1) Show or Hide the side menu.
- 3.2) Show or Hide the top bar.
- 3.3) Resizes the screen to bigger or smaller.
- Bar for scrolling the text in the box with warnings.
- Button that advances to the next screen.
Button (3) is used to get more space on the main screen, both vertically and horizontally.
The screen can also be maximized, minimized or closed with the buttons available in the top bar.
You can also move the screen by clicking and dragging the top bar.
If you click and drag the edges of the screen, it will resize.
Logging in.
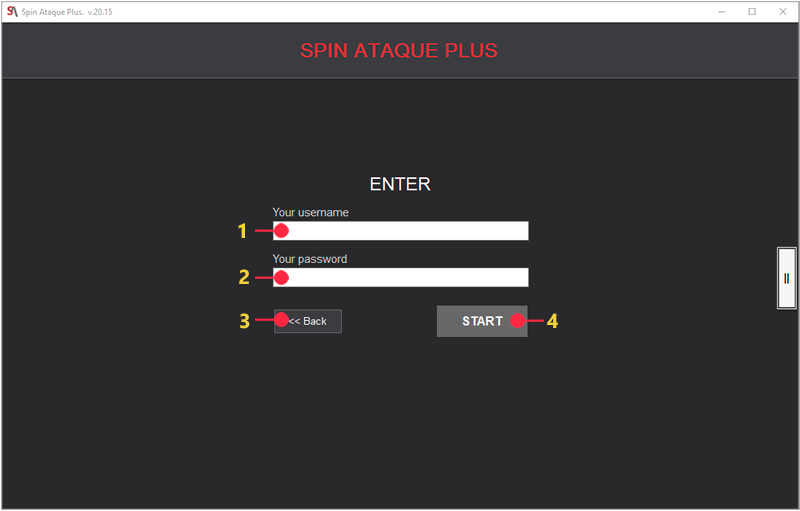
LEGEND:
- Dialog box for entering your username.
- Dialog box for entering your password.
- Button to choose your language again.
- Button to go to the next screen.
After you click button (4), the system will check your data and some error messages may appear.
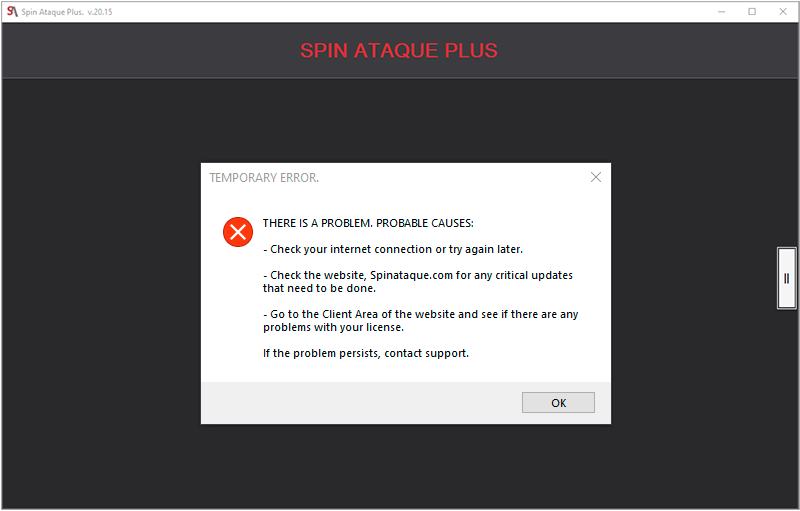
ERROR MESSAGES:
- INCORRECT DATA: Check that you have entered your correct username and password. The system is case sensitive.
- CONNERCTION ERROR: Check if your Internet or network is active. The system requires an Internet connection to be able to log on to the system.
- SERVER ERROR: It may happen that our server is under maintenance or temporarily unavailable. In this case, you should try again later and if the error persists, please contact support.
- AUTHENTICATION FAILURE: Your license has expired, been blocked, needs to be activated, your account has been suspended, someone has used your access data without your authorization, etc. In this case, log into your customer area and check the status of your license.
- PAYMENT NOT COMPLETED: Awaiting payment for an order, order or payment cancelled, payment deadline expired, payment not yet processed.
After being authenticated by the system, the main system screen will appear.
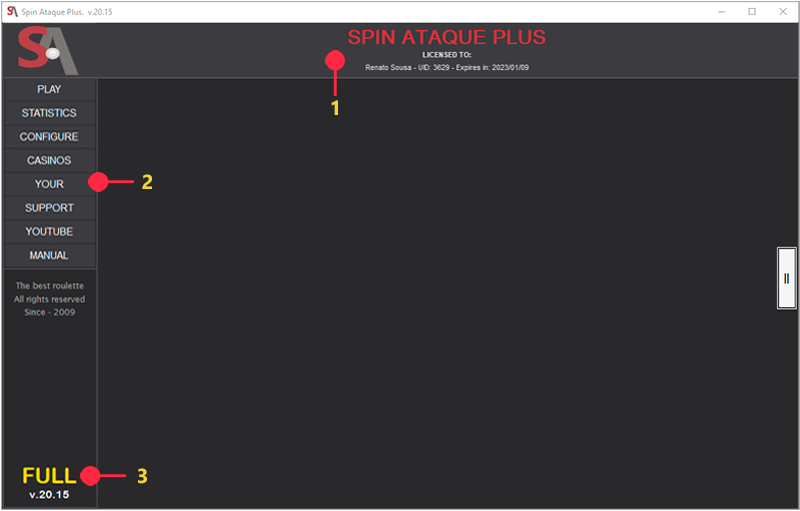
LEGEND:
- Top bar with your data and your license information.
- Side menu with the system options.
- Versão do sistema e tipo Demo ou Full.
- Screen settings button.
PLAY.
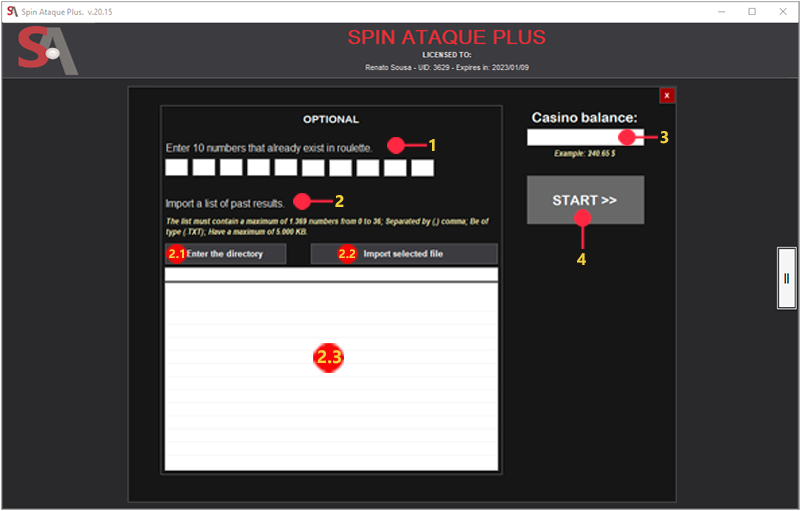
When you click on the play button the system understands that you will start a gaming session at the casino and in order for the system to try to control your winnings, losses and issue alerts you need to inform your balance at the casino.
Optionally you can tell the system, the last 10 roulette numbers that may or may not be available in the casino roulette you are playing.
You can also import previous game results that were saved on your computer.
LEGEND:
- Dialog box to enter the last 10 roulette numbers you will play.
- Import previous results:
- 2.1) Button to inform the system in which folder on your computer is the file to be imported.
- 2.2) Button to import the informed file.
- 2.3) Area where the files to be imported are presented. You must select a file and then click on the button (2.2) so that the system starts importing the result numbers that were saved in your previous game session.
The file to be imported must have a format that is compatible with the system, otherwise an error message will appear. The system imports up to 1,369 numbers and the file cannot be larger than 5,000 Kb.
- Dialog box for informing your casino balance. To use decimal places, use the (dot).
- Button that starts the game session.
After entering your casino account balance and clicking on button (4), the system is ready to begin your gaming session. The main game screen will then appear, which is made up of several areas of information and commands. See below:
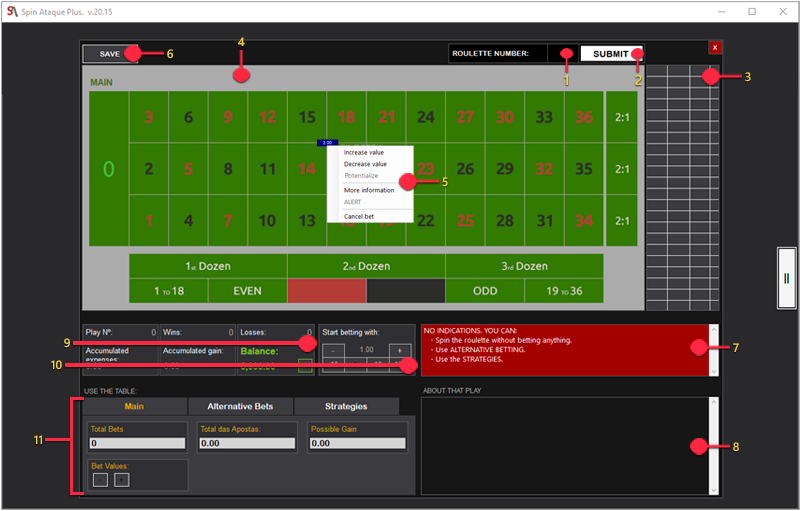
LEGEND:
- Dialog box for entering the numbers being drawn at the casino roulette wheel you are playing.
- Button used to send the number drawn in the roulette wheel to the system.
- Area where the numbers entered into the system are displayed.
- Graphical representation of the roulette table where the plays and the amount that must be bet in each play are indicated.
- Drop-down menu: This option allows a player to perform individual actions for each move. To access this menu, simply click on the suggested move. The options in the drop-down menu are:
- 5.1) INCREASE: Increases the amount of the selected bet.
- 5.2) DECREASE: Decreases the value of the selected bet.
- 5.3) BOOST PLAY: This option is used when the player wishes to increase his winnings. The system activates this option at the right moment and suggests to the player, bets that involve the numbers in the suggested move. These suggestions are displayed in the information area (8).
- 5.4) MORE INFORMATION: Provides the player with detailed information about the suggested move such as: amount spent on the move, prize it pays, hit percentage, expected profit, numbers that make up the move, how many times you have already bet on that move, etc. Information presented in area (8).
- 5.5) ESCAPE: If you are losing heavily on a given turn, the system will mark the turn with red, indicating the player should change his bet, by clicking on the bet with red color and choose: ESCAPE. In the area of the screen marked 8 (see image above), you will find the information you need to change your move and try to recover all or part of your bet.
- 5.6) CANCEL BET: If desired, the player can cancel a suggested bet. The cancellation of bets does not affect the results, the system only understands that the player does not want to make that bet.
- Button used to save the results obtained in a game session. After saving, the system will allow you to import the saved results before a new session starts. When clicking on the save button, a new screen will appear and the player must inform in which folder he wishes to save the results file and the name of this file. With this feature the player can save the results of several casinos and their sessions. Example: casino1-day1, casino1-day2, casino2-day1, etc.
- Space used by the system to issue warnings, alerts and actions to be taken.
- Space used by the system to give various information about the suggested moves.
- Panel with information about how many moves were performed, how many wins the player got, how many losses, accumulated spend, accumulated win and current balance. The system allows the player to adjust his balance in the casino, just click on the dialog box, Current Balance, type the new balance and click on the button, ">".
- Initial Bet Amount. The system needs to know how much the player wishes to bet on his first bet, then the system calculates the value of the following bets. If you wish to bet a higher or lower amount than the system suggests, simply choose whether to increase or decrease the initial bet amount ( 0.10, 1, 10, 100 ) and click the (-) or (+) button. This type of setting affects all suggested bets. To change the value of a particular bet, you must use the drop-down menu.
- Table Selector: There are 3 types of tables:
- 11.1) Main table: Table where the normal bets suggested by the system are placed. It provides information about the bets in play.
- 11.2) Alternative betting table: The system provides 24 types of alternative plays that are used to try to win little but surely or when the casino does not allow you to spin roulette without betting anything. The main purpose of this table is to buy time by performing low-risk plays until the system can indicate more accurate plays.
- 11.3) Strategy table: This table shows the player 19 types of roulette strategies. These are the best known and safe strategies to play. They are not invented strategies. They are strategies used for a long time by renowned players and therefore have a good margin of success.
In the case of the alternative betting tables and strategies, before the player submits the number that was drawn on the roulette wheel, he must inform the system that he will make the move, answering, YES to the question, "Do you want to bet on this move?". See the example:
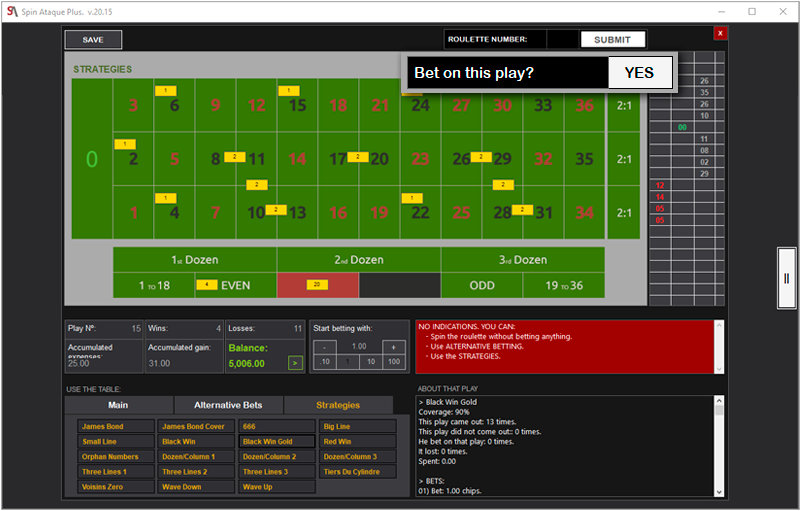
ATTENTION:
- Whenever possible, try to spin the casino roulette wheel without betting anything and just go about informing the system of the results. If the casino of your choice does not allow you to spin the roulette wheel without betting, then place random bets with the minimum amount allowed by the casino or if you don't want to take high risks, use the alternative betting table.
- The SpinAttack needs 12 to 20 numbers before it can start indicating moves. It is not guaranteed that a move indication will come up on the very first bet, so it is important that you always keep an eye on your balance. If you make more than 23 moves and the system does not give any suggestions we recommend that you leave the casino and return to play after a few hours, if after returning the delay continues then it is better to return to play only after 24 hours.
- The system works with exact sequences of entering numbers. If you give the system a wrong number, or forget to enter a number, the system may start suggesting false moves. If you notice that this has happened, it is best to leave the game and start again.
-
Saving and importing results is no guarantee that the system will become more accurate. There are casinos that save the results of a session and others that do not. There are also casinos that consider each session as unique and in those cases saving and importing results will not help at all, on the contrary, in some cases saving and importing previous results can cause you to lose all your money.
We cannot predict in which casinos this option is valid. We recommend that before using this option you test in the casino of your choice using the option, "Play for Fun", available in all casinos. - You are not obligated to follow all system directions. The indications are suggestions and as such, can be ignored by the player who decides whether or not to follow them. Remember, the system only indicates the most probable moves, the player decides if he does them or not, you are the only responsible for the results obtained and it is important to emphasize that the system is not infallible and can cause losses, your experience and common sense are still your best strategies.
STATISTICS.
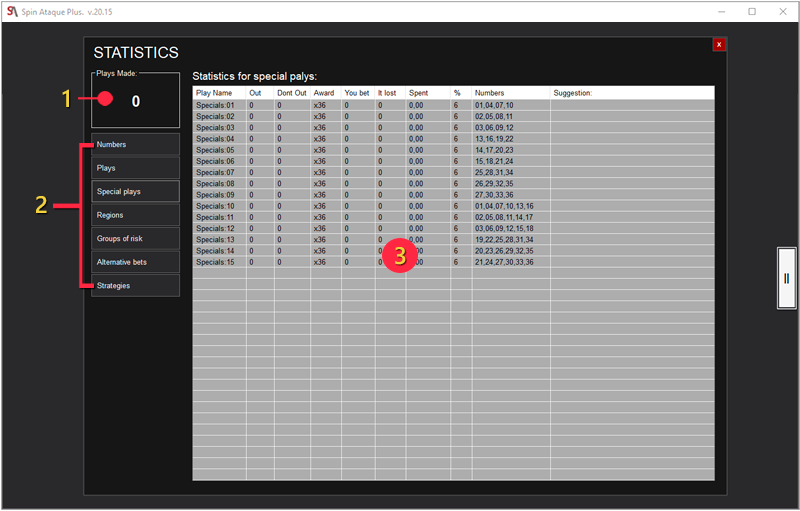
LEGEND:
- Plays Performed: Amount of moves performed.
- Selection menu: Buttons with the types of statistics.
- Statistics display area.
The main purpose of statistics is to provide data about the moves of a roulette. Based on this information the player can decide more safely whether to place a certain type of bet or not.
The statistics depend on the current amount of moves made, the greater the amount of moves made, the greater the accuracy of the statistics.
The system provides the player with seven types of statistics, each with its own purpose. See below what they are for and how you should interpret each type of statistic.
NUMBERS:
Tells the player how many times a certain number has come out (Out).
NORMAL MOVES:
Information about the normal moves at a roulette table. This information is useful because it confirms the moves indications provided by SpinAttack. The moves indications are available at the Main Table from the play option. By analyzing these statistics, the player can also find potential moves that can be made based on his guess on the number of times a move has come out or is missing.
- Play Name - Name of the play.
- Out - How many times a number that makes up the move has come out.
- Not Out - How many moves it is without going out.
- Award - Prize the move pays out.
- Bet - How many times the player bet on the move.
- Lost - How many times the player has lost in the turn.
- Spent - How much the player has bet or invested on the turn.
- % - Probability of hitting on the turn.
- Numbers - Numbers that make up the move.
SPECIAL PLAYS:
Special plays are not part of the normal plays of a roulette wheel, however can determine, sequences of numbers that are more likely to come out. It is similar to Hot Numbers and Cold Numbers. With the information from this statistic, the player can choose to bet on plays that make up the special play numbers.
- Play Name - Name of the play.
- Out - How many times a number making up a special move has come out.
- Not Out - How many moves it is without going out.
- Award - Prize the move pays.
- You Bet - How many times the player bet on the move.
- It Lost - How many times the player has lost on the turn.
- Spent - How much the player has bet or invested on the turn.
- % - Probability of hitting on the turn.
- Numbers - Numbers that make up the move.
- Sugestion - As this type of play is managed by the system itself, it is possible to provide the player, suggestions of how much to bet, how to bet or even if the player should not bet on the play. In case you are betting on a special move and are losing, the system will suggest alternative moves in order to decrease losses.
REGIONS:
Is able to inform the player, the region of the roulette table that is giving out the most times. Each region is composed by a quantity of numbers. This option is particularly interesting for live roulette.
- Region - Name of the region.
- Out - How many times a number that makes up a region has come out.
- Numbers - Numbers that make up the region.
- Sugestion - As this type of play is managed by the system itself, it is possible to provide the player, suggestions on how much to bet, how to bet or even if the player should not bet on that region. In case you are betting on a region and you are losing, the system will suggest alternative moves in order to decrease losses.
RISK GROUPS:
Certain types of number sequences, are considered, less likely sequences. We call these sequences Risk Groups. If a certain Risk Group is coming out too often System will alert the player that the casino may be sending unlikely numbers. Based on this statistic the player should avoid placing bets on numbers that are part of these groups.
- Group - Name of the group.
- Out - How many of the numbers in the risk pool have come out.
- Numbers - Numbers that make up the group.
ALTERNATIVE BETS:
Alternative bets are multiple bets, meaning they are made up of more than one bet. Considered low risk and low cost, alternative bets can serve to recover small losses or be used to place bets and thereby obtain the casino's roulette numbers until SpinAttack is able to start indicating moves. To learn how to apply an alternative bet, use the Alternative Bets table in the play option.
- Alternative Bet - Name of the move.
- Out - How many times an alternative bet has come out.
- Not Out - How many times it has not come out.
- % - Probability of hitting on the roll.
STRATEGIES:
A roulette strategy is a combination of bets that aims to cover as many numbers as possible, that is not as risky, and that promotes profits. Based on the data in this statistic, the player can easily decide whether it is worth taking a chance on a strategy or not. To learn how to apply a strategy, use the table Strategies of the option play.
- Strategie - Name of the strategy.
- Out - How many times an alternative bet has come out.
- Not Out - How many times it has not come out.
- You Bet - How many times the player has bet on the move.
- It Lost - How many times the player has lost on the turn.
- Spent - How much the player has bet or invested in the turn.
- % - Percentage of table coverage.
CONFIGURE.
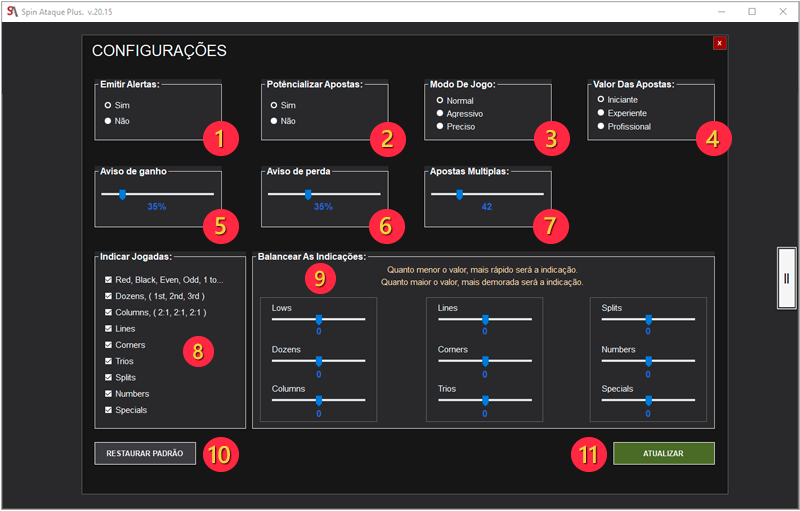
LEGEND:
-
SEND ALERTS: Issues alerts about low balance, stop playing, dangerous games, etc.
If Yes, the system will constantly send these alerts.
If No, the system issues the alert only once and stops. -
POTENTIALIZE BETS: Receive indications of moves that are similar to the indicated move in order to increase the player's profit. However, you should use this option with care because the cost will be higher.
If Yes, the system will show you how to potentiate a move.
If No, the system will not show you how to maximize a move. -
GAME MODE: This option tells the system how precise the player wishes to be in the indications. Depending on the game mode, the player can configure the system to provide slower or faster indication. Depending on the casino, the player can tell the system that he wishes to receive the move indications faster or slower. The slower the more accurate the indications will be, the faster the less accurate. The modes are:
NORMAL: This is the standard mode used by most casinos.
AGRESSIVE: The system will understand that the player wants to receive indications faster.
ACCURATE: The system will indicate moves with greater precision, but it will take longer. -
BETTING VALUE: Determines the profit the player wishes to obtain on his bets.
BEGINNER: The system will calculate the value of the bets so that the player wins at least 1 chip more than the amount bet. It is safer and less expensive.
EXPERIENCED: The system will calculate the bet amount so that the player wins at least 2 chips more than the bet amount. This option should be used when the player wishes to make quick profits without playing for a long time.
PROFESSIONAL: The system will calculate the value of the bets so that the player wins at least 3 chips more than the bet. It needs a high bankroll and if the player loses several times in a row, his balance will be quickly consumed. - GAIN ALERT: Used to set an earnings limit in relation to the initial balance. Whenever you exceed the limit you set, the system will issue an alert. The ideal value is 35%.
- lOSS ALERT: Used to set a spending or loss limit in relation to the initial balance. Whenever you exceed the limit you set, the system will send an alert. The ideal value is 35%.
- MULTIPLE BETS: Maximum amount of moves per indication. For example: If the player sets this option to 2, the system will understand that the player wants to make at most two bets per move. Even if the system has 3 indications to provide the player, it will suggest only 2.
- INDICATES PLAYS: The player can tell the system which plays he wishes to make. The use of this option is very simple, check the moves you want the system to indicate and uncheck the moves you don't want the system to indicate.
- BALANCE INDICATES: Depending on the casino you are playing, you can tell the system how often you want to receive indications of a particular move. For example: If you notice that the system is indicating the move (LINE) too early and you are having to bet several times before the move comes out, then INCREASE the indication time for that move by sliding the indicator to RIGHT. If you slide it to the LEFT, the move will be indicated more quickly. The lower the number, the faster the move will be suggested. The larger the number, the longer the move will take to be suggested.
- RESTORE DEFAULTS: Restores the system to its default settings.
- UPDATE: Updates the system settings. If you change a setting and do not click this button, the system will not take over the change. In order for the system to work with the configuration you made, you must click this button.
These settings are important and can determine the results obtained in a given casino. Each casino has a roulette game manufacturer that uses different settings and can increase or decrease the degree of difficulty.
With this option you can adapt the system to your preferred casino increasing the precision.
Be aware that the system does not store a setting you have made. When you exit the system the settings return to the defaults. If you have made a setting that you think is best for the casino you use, it is best to note the settings you have made.
We are working on having a SAVE your settings button in the next update.
CASINOS.
A list of about 12 casinos is presented. These casinos are the ones that we have tested at recently and that users report are making the highest profits.
YOUR ACCOUNT.
With this option, the user has access to his data and his licenses, can buy new licenses, check status, update his system, etc. You must be logged in to the site.
SUPPORT.
Through this option, the user has access to a support request form with personalized service. It is necessary that you are logged on to the site.
YOUTUBE.
Link to access our channel on Youtube where we offer videos about several subjects related to gambling, tips on how to use SpinAttack, tips on how to use the site, promotions, raffles and much more.
In order not to miss any news and benefit from the advantages we have to offer, you need to subscribe to the channel and activate the notifications.
CLIENT AREA MANUAL
Home:
The main screen of the Client Area is divided into 7 parts:
- MENU: Located in the left part of the screen containing all the options of the Client Area.
- TOP: Contains information about since when you have been a client, your current plan, date it expires.
- NOTES: Space with notes about the system.
- WHAT TO DO TODAY: Shortcuts with basic functions.
- THIS IS OF YOUR INTEREST: Miscellaneous links with information and tips on how to play roulette and tips on casinos.
- CASINOS TESTED: Indications with the best casinos to use SpinAttack.
- FINAL PAGE: Links and information related to the site.
My account:
Option used to update your registration data.
When you click on this option, a new screen will appear with a new Vertical Menu composed of 4 options. Each option contains a form with data related to a subject. To update your data, simply click on the option in the Vertical Menu that contains the desired subject, locate the field you want to change, change it, and at the bottom of the screen click on the button: UPDATE. The options are:
-
YOUR ACCOUNT: Contains information about your account. Fields with a gray background color, cannot be changed. The fields on this form are:
- ID: Your identification number in the system..
- REGISTRATION DATE: Date you registered in the system.
- PLAN: Your current plan.
- EXPIRATION: The date that the plan will expire.
- USERNAME: Your username to be able to log into the system. Maximum 25 characters. Uppercase and lowercase letters make a difference.
Accepts - Letters, Numbers and the Characters: $ # @ : / * - + _ - PASSWORD: Your password to access the system. Maximum 15 characters. Uppercase and lowercase letters make a difference.
Accepts - Letters, Numbers and the Characters: $ # @ : / * - + _ - EMAIL TRF: This field will be disclosed to other users should you decide to sell your TRF licenses. We strongly recommend that you use an email address only for this purpose and never use your personal email in this field.
-
PERSONAL DATA: Form with your registration data. Under no circumstances do we share or disclose this data.
- NAME: Your name or a nickname.
- EMAIL: Your email address that we will use to send you communications about the system, promotions, notices, etc.
- COUNTRY WHERE YOU RESIDE: This field is required so that we can process your payments.
- LANGUAGE: Language of your preference.
- HISTORY: Contains information about your purchases, downloads, renewals, etc. This field cannot be changed.
- AVATAR: If you wish, you can assign an avatar to your profile. This avatar will be shown in the BLOG whenever you make a quote. To choose an avatar just click in the box corresponding to the desired gender, Male, Female or Show and then, choose one of the available options. At the end, click on: UPDATE.
- PREFERÊNCIAS: If your plan is Free or Basic, you will not be able to change these preferences. Here you will be able to choose how you want to interact with us, and whether or not you wish to receive certain types of communications in your email. If you wish, you can cancel your account by clicking on the black button at the bottom of the form: CANCEL MY ACCOUNT.
My Licenses:
Option used to manage your Licenses, Subscriptions and TRF Licenses.
The first part, refers to your plan where the information is arranged in a table composed by the columns:
- DOWNLOAD: date when you last downloaded. (How many downloads did / How many can still do).
- PLAN: Name of the active plan.
- EXPIRED IN: Date it will expire.
- PAYMENT: Payment status. When there is a payment with the status of: Pending or Waiting, the button will appear: . By clicking on this button, a new window will appear with information about the payment and the status will be updated. If the payment has been processed by the entity that received it, the system will automatically release your license.
- ACTIVE: if your license is active for your computer. (How many activations you have done / How many you can still do). Whenever the system detects that your license has been used on a computer other than your own, you will need to activate your license, otherwise, when entering the program an error message will appear that will prevent you from proceeding.
-
ACTIONS: processes you can perform with your license. Each icon represents a different action. If an icon is grayed out, it means that the action corresponding to the icon cannot be performed at that time. The actions are:
- BUY: used to subscribe to a plan or buy TRF licenses.
- VIEW DETAILS: shows various information about your license. Clicking on this option will bring up a new window with various information about the license.
- RENEW: used to renew a subscription. If your subscription has not expired, you will get a 10% discount.
- DOWNLOAD: used to download the demo or full version of SpinAttack. It can also be used to download a new version or update of the software.
- ACTIVATE: Whenever the System detects that your license is being used by another person or on another equipment, it will be necessary to activate the license for that computer. Otherwise, when you enter an error message will appear alerting you of the need to activate the license and you will not proceed until it is activated. there is a limit to the number of activations.
- CANCEL ORDER: if after 3 days of an intended purchase having been made, the system doesn't detect the payment, this icon will appear and the user can cancel his order.
- HISTORY: all your purchases related to the subscription plans, are recorded in the system. If this icon appears just below the active license table, it is because you have history and just click it and a table with all your purchases will open. If you have no history of purchases, you will only see the phrase: "No History".
In the second part of the screen, there is the information related to your TRF LICENCES.
The information is arranged in a table that contains all of your TRF licenses that have not been transferred. This table has the following fields:
- ACQUIRED: date the license was acquired.
- PAID: Status of the payment. If you have a Pending or Awaiting payment, the button will appear: . Clicking on this button will bring up a new window with information about your payment and the status will be updated. If the payment has been processed by the entity that received it, the system will automatically release your license.
- PURCHASE VALUE: Amount paid for the license.
- VALUE SALE: amount you intend to sell the license for.
- LICENSE NUMBER: license serial number.
-
SITUATION: current state of the license which can be:
- IN PAUSE: when a license is not for sale.
- FOR SALE: when a license has been put up for sale and is available on the License Market.
- TRANSFERRED: when a license has been transferred to the buyer.
- BLOCKED: when a license is awaiting payment. If the system detects any irregularity on the part of the license owner, it may be blocked, in which case it is best to contact support and ask why the license is blocked.
-
ACTIONS: procedures that can be done with the license. The procedures are represented by icons, each icon has a specific function. If an icon is in gray color, it means that that action cannot be performed at that moment. Possible actions are:
- View license details. A new window will appear with various information about the license.
- Put a license on sale. A new window will appear with some license data and the license owner must enter the Amount he wants to sell his license for and the Currency. Upon confirming this data, the license will move to the License Market.
- Transfers the license to a buyer. If a license is sold, the seller must transfer the license to the buyer. By clicking this action, a new window will appear and the seller must enter the buyer's TRF ID and EMAIL, then click the button: TRANSFER. The license will be transferred to the buyer and instantly activated. This is an irreversible process, so we advise you to be very careful when entering the buyer's data.
- Putting a license on hold. Whenever a license is put on "PAUSE", it is removed from the License Market. As soon as the license owner wants to, he can put it on sale again.
- SUMMARY: right below the TRF license table, there is a summary that is divided into two tables, the first is the amount spent on TRF license purchases, the second is a forecast of earnings from the sale of your licenses.
- HISTORY: all your purchases related to TRF licenses are recorded in the system. If this icon appears just below the summary, it is because you have history and just click it and a box with all your purchases will open. If you have no history of purchases, you will only see the phrase: "No History".
Download / Install:
In order to download the program, you must first be registered on our site. To register, enter our site and the: TOP MENU look for the option: CLIENTS > Sign Up.
Then fill out the form and at the bottom of the page click on: SEND.
Ready, you will receive an email confirming your registration.
After you have registered, go back to: TOP MENU and click on the Option: CLIENTS > Login.
Then provide your access data (Username and Password) and click on the button: LOGIN, please be aware that these fields are case sensitive.
To download the program, follow the steps:
-
Being in the Client Area, at: LEFT MENU, click on the option: DOWNLOAD and then and then choose the option: VERSION 20 demo/full. A new screen will appear.
It is very important that you read the Terms and Conditions and especially the Pre-Requirements necessary to install the Software.
Pay attention to your operational system. May not work on equipment with Windows 7 or lower. We recommend that you have Windows 10 or higher with the updates done, otherwise the installation of the program may not be successful.
At the bottom of this new screen, click on the button: DOWNLOAD. - The download will start automatically and the file: Spinataque-Plus-Install.rar, will be saved in the default download folder that is configured on your machine.
To install the program, follow these steps:
- Once the download is done you will need to unzip the installation files. You will need to have installed on your computer a program that compresses and decompresses files, such as WIN-RAR. If you don't have it, you can download Win-rar for free from the company's official site. Link - https://www.win-rar.com/start.html
- To decompress the installation file, go to the folder where you saved it and locate the file: Spinataque-Plus-Install.rar nd double-click on it. The unzipping program will open.
- In the unzip program, choose the folder where you want the installation files to be saved and click on: Unzip or Extract to.
- Go to the folder where the installation files were unzipped and browse for the file: setup or setup.exe and double-click on it, the installation will begin, just follow the steps described in the installation program.
- After completing the installation, the shortcuts to access will be created on your Desktop and in the Windows Start Menu.
Buy:
There are 4 situations where the buy option can be used. Although the purpose of each purchase option is different, the way to make the payment will always be the same. Each icon refers to a type of purchase, see below what they are:
- Subscribe to a plan to be able to use the full version.
- Buy TRF licenses.
- Renew a subscription.
- Migrate from version 19 to version 20.
In case you want to subscribe to a plan:
The purchase process is done in 3 steps at most. However, we will explain the whole process in detail. Because of this you may have the impression that the purchasing process is complicated, but it is not, in some cases with just 2 clicks your purchase is accomplished.
- Click on the shopping cart icon available in the Left Menu of the Client Area or if you are in My Licenses, click on the shopping cart available on the right side of the screen. When you do this a new screen will appear.
- On this screen you will need to read and agree to the terms and conditions of purchase. To agree to these terms, at the bottom of the screen click on: I declare that I have read and agree with the terms and conditions of use. After that, click on the button: Continue.
-
On this new screen you will have to choose the CURRENCY you want to pay and what you want to buy.
In this case, check the option: Subscribe to a park plan to use the full version. Then click on the button: Go to step 2. - The available plans and their values will appear. If you want to know the difference between the plans, just click on the yellow button labeled: See plan details. Click on the plan you wish to subscribe to and then click on the button: REVIEW ORDER AND PAY.
-
Finally, review your order and choose the company that will process the payment: PayPal, PagSeguro, Netteler or ecoPayz. Click on the logo of the company you wish to use.
Here it is worth noting that each company has different payment methods and the payment processing time may vary.
In the case of Netteler and ecoPayz, processing will not be automatic. When you choose one of these companies, you will receive instructions on how to make the payment. - When you click on the logo mark of the company you have chosen, you will be redirected to a secure page on the company's site where you can choose your payment method.
- After making the payment you just have to wait for the approval of the order. The release of the license is not immediate and can take up to two business days. In the case of Paypal and Pagseguro, the average time for approval and release of a license is 2 minutes.
- You will receive an email with the summary of your order and, if applicable, instructions to make the payment manually.
- To track the status of your payment, go to MY LICENSES and click on the icon: .
In case you want to BUY TRF Licenses.
The process is exactly the same as signing up for a plan, with the exception of step 3 where you must select the option: Buy TRF Licenses
In step 4, instead of the subscription plans, the packages with TRF licenses will appear. Each package has a number of licenses and a value. The larger the package, the greater the discount.
Only users who have the Standard Plan or higher active will be able to acquire TRF licenses.
Users with a Free or Basic plan are not allowed to buy such licenses.
In case you want to RENEW your license.
Renewing a license is much simpler, go to MINHAS LICENÇAS and click on the icon: .
A new screen will appear with your current license data and you will only have to choose if you want to renew to the same plan or if you want to renew your license to another plan.
If your license is not expired, you are entitled to a 10% discount.
The days remaining until your license expires will be credited to your new license expiration date.
In case you want to MIGRATE from license 19 to 20. :
To migrate your license, go to the Left Menu and click on the icon: .
A new screen will appear with the instructions to perform this procedure.
Migrate:
This option is only for system users who have version 19 full and wish to switch to version 20. New users or users who have only demo version 19 will not have access to this module.
For users of version 19 full migrating to version 20 will have discounts that can reach 40% and in some cases, will have no cost at all.
This procedure can be done only once and to migrate is very simple, just follow the steps:
- Click on the option: MIGRATE, a new screen will appear with the data from your old license and the rules to be able to migrate.
-
Choose which plan you wish to activate.
Depending on your case, the button to migrate free may or may not be active, if this button does not appear for you, it is because the deadline to migrate free has passed. - If you cannot migrate for free, then after you have chosen the plan, choose which company will process the payment.
- From here on the process is identical to the purchase process.
Marketplace:
The License Market is the place where any user can buy licenses for affordable prices.
Buying a TRF license is equivalent to subscribing to the Standard plan, the only difference is the value that can be up to 70% lower than the normal list price.
There are two types of people who can participate in the License Market, the first is the buyer; Person who wants to buy a license to use the full version of Spinataque with the Standard Plan active.
The second is the seller; a person who buys TRF licenses to sell. The seller is the one who determines the amount they want to receive when transferring their TRF license to a buyer.
The seller, after purchasing a TRF license, goes to the Customer Area and through the option: MY LICENSES, can put a license on sale, put a license on hold, and transfer the license. These functions are described in the topic: MY LICENSEES.
As we said, any user can BUY a license to use Software, but only users who have a Standard Plan or higher active can sell their TRF licenses.
Being on the License Marketplace page, the buyer is faced with a list where the licenses that are for sale are displayed. This list consists of:
- Seller's email address.
- The number of the license that is for sale.
- The amount the seller wishes to receive from the buyer.
- How much the buyer will save if he buys the license from the seller.
The interested buyer contacts the seller via the email address on the list and arranges payment.
Once the seller receives the agreed amount he transfers his license to the buyer.
After transferring the license, at the same moment the buyer has the Standard Plan active and will be able to use the full version.
The buyer, having the Standard Plan active, can also buy and sell TRF licenses.
Pricing:
With the Prices option the user can consult the value of the available Plans in 3 different currencies, Euros, Dollars and Reais.
When you put your mouse over the Price option, a side menu will appear, just click on the desired option.
You will also be able to see the differences between the plans, the functionalities and the restrictions that the system has.
Support:
Whenever you need to clarify a doubt or talk to our technical staff for any reason, just click on the option: support and fill out the form.
This form has only two fields, Subject and Message. After explaining your question, click on the SEND button located at the bottom of the form. As soon as we receive your message, within 24 hours at the most, we will send the answer to your email.
Manual:
Access link to this manual that when clicked will open a new window in your browser.
The manual is composed by two Menus: one about the SpinAttack program and the other about the functions of the Client Area.
By clicking on any item of the menu that is located at the beginning of the page, the user is positioned in the text related to the item clicked.
If the user wishes, he can return to the initial menu just by clicking on the icon: located in the middle of the line that separates one subject from the other.

